In summary:
- Your pilot light going out is usually a safety feature, not just a broken part. The most common cause is a dirty or failing thermocouple.
- The thermocouple is a small generator that uses the pilot’s heat to create electricity, holding the gas valve open. No heat means no electricity, and the valve shuts for safety.
- Before calling a pro, you can safely check for simple issues: a dirty thermocouple tip, poor flame alignment, or a blocked air intake vent (especially from snow in Quebec).
- Any repair involving the gas valve itself must be done by a CMMTQ-certified technician in Quebec.
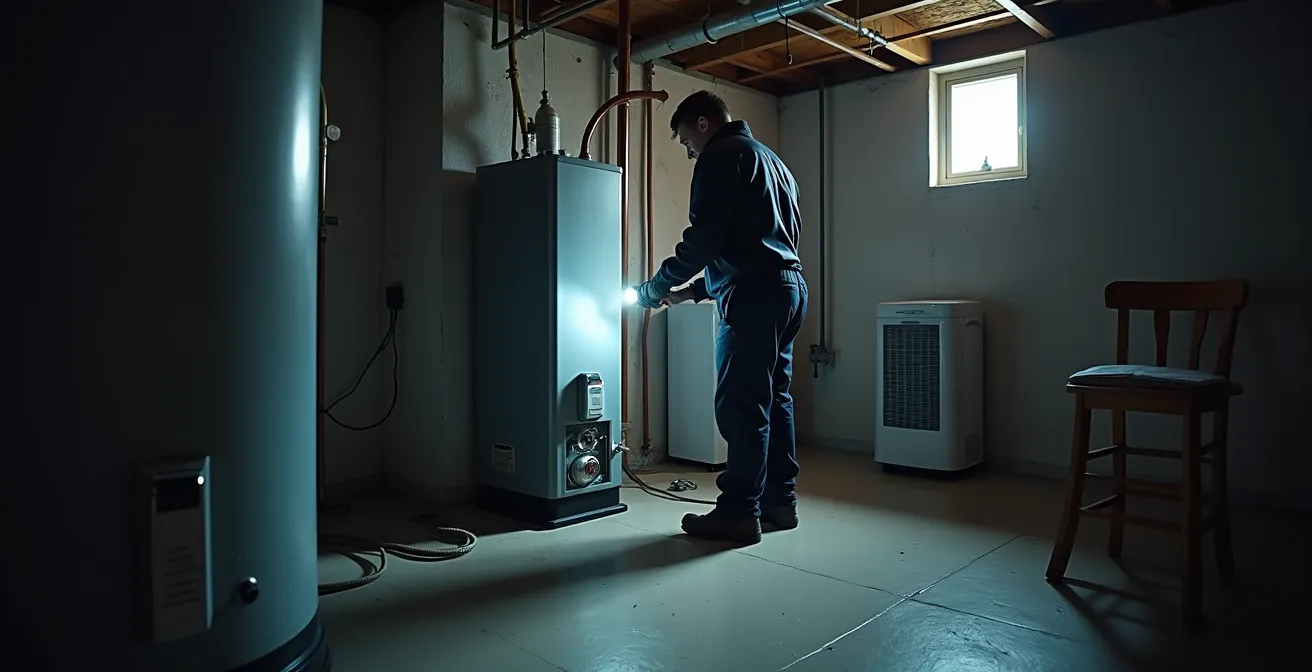
There are few domestic frustrations as immediate as turning the shower knob and being met with a stream of icy water. Your first suspect is often the gas water heater. You head to the basement, follow the instructions, and try to relight the pilot. You hold the button, the small flame flickers to life, but the moment you release it, it dies. You try again. Same result. It’s a common scenario that sends many Quebec homeowners straight to the phone to call for an expensive emergency service.
Most online guides will give you a simple checklist: clean the thermocouple, check for drafts, or replace the part. While this advice isn’t wrong, it misses the most crucial point. That pilot light system isn’t just a simple lighter; it’s an elegant and vital safety interlock. Understanding *why* it’s failing is far more powerful than just knowing which part to swap. The thermocouple isn’t just “broken”; it’s often doing its job perfectly by shutting down an unsafe condition.
This guide is different. As a gas technician, I’m not just going to give you a to-do list. I’m going to walk you through the system’s logic, explaining the hidden physics at play. We’ll explore how that tiny flame generates its own power, why its position is a matter of precision engineering, and how Quebec’s unique climate can introduce surprising problems. By understanding the “why,” you’ll be empowered to diagnose the issue safely and confidently, knowing when a simple cleaning is enough and when you absolutely must call a certified professional.
In this article, we will break down the function of each component of your pilot light assembly. We’ll move from the core principle of power generation to the practical steps of cleaning, alignment, and troubleshooting, giving you the knowledge to tackle this common problem like a pro.
Summary: Why Your Gas Water Heater Pilot Light Won’t Stay Lit
- How Does a Small Flame Generate Electricity to Open the Gas Valve?
- Dirty Thermocouple: How to Clean It Without Damage Using Sandpaper?
- Pilot Flame: Why Is Alignment with the Thermocouple Critical?
- Gas Fireplace: Which Part to Change When the Remote No Longer Responds?
- Changing a Universal Thermocouple: Threading Pitfalls to Avoid
- Combustion Air Intake: Why Should It Never Be Blocked by Snow?
- Oil Smell in the House: Is It Normal at Startup or a Dangerous Leak?
- How Does a 96% Efficiency Gas Furnace Save You Money on Energir Bills?
How Does a Small Flame Generate Electricity to Open the Gas Valve?
It sounds like magic, but the principle that allows your pilot light to control a powerful gas valve is a fascinating piece of 19th-century physics called the Seebeck effect. At the heart of your pilot assembly is the thermocouple, a sensor made of two different types of metal wire joined at the tip. When this junction is heated by the pilot flame, the temperature difference between the hot tip and the cool end (connected to the gas valve) generates a tiny electrical current, typically around 20-30 millivolts.
This small voltage is just enough to power an electromagnet inside the gas control valve, holding a small safety valve open and allowing gas to flow to the main burner when the thermostat calls for heat. It’s a brilliant, self-powering safety interlock. If the pilot flame goes out for any reason, the thermocouple cools down instantly. The electrical current stops, the electromagnet de-energizes, and the safety valve snaps shut, cutting off all gas flow. This is why a faulty thermocouple doesn’t cause a gas leak; its failure mode is to safely shut everything down.
This macro photograph shows the critical point where heat is converted to electricity. The blue pilot flame envelops the thermocouple’s tip, creating the temperature differential necessary for the Seebeck effect.
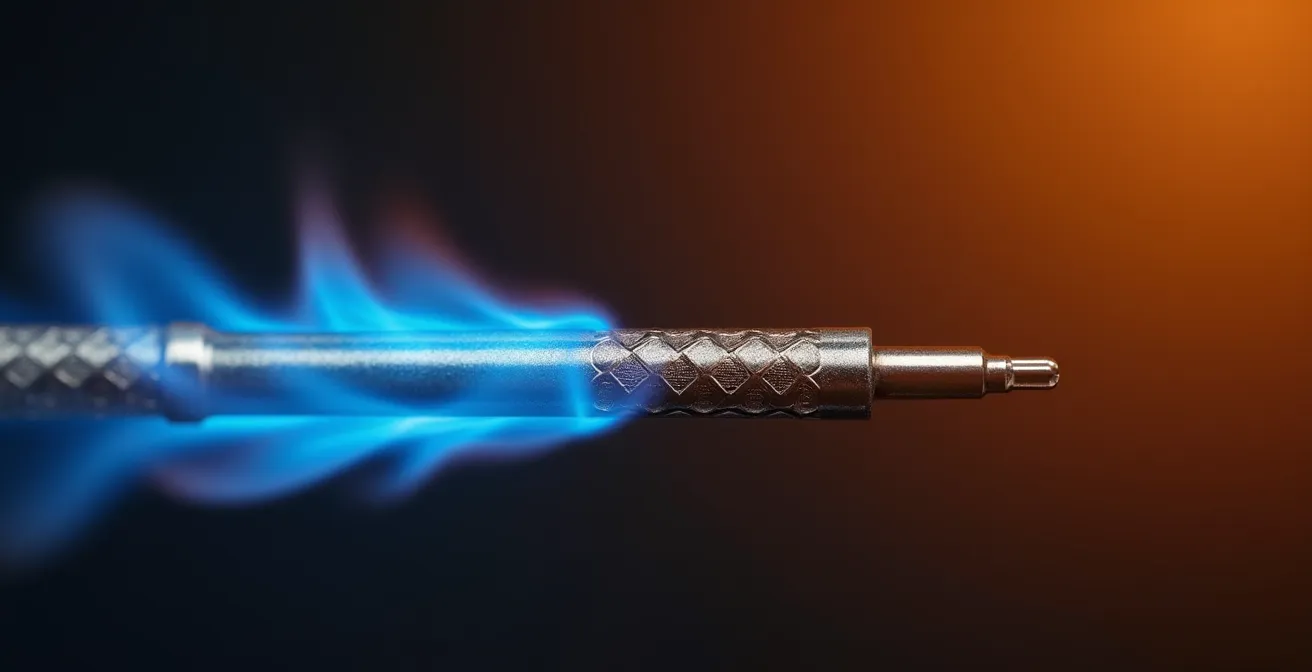
As explained by Canadian service experts, this function as an automatic safety shut-off is the primary purpose of the thermocouple. When your pilot light won’t stay lit, it’s often the system telling you that this crucial electrical signal is not being properly generated or received, prompting the valve to do its job and prevent gas from accumulating.
Dirty Thermocouple: How to Clean It Without Damage Using Sandpaper?
Over time, the tip of the thermocouple can become coated with a fine layer of soot or carbon buildup. This deposit acts as an insulator, preventing the pilot flame from heating the bimetallic junction effectively. Even if the flame is perfectly healthy, the thermocouple won’t get hot enough to generate the required millivolts, and the safety valve will refuse to stay open. This is one of the most common reasons a pilot light won’t stay lit.
While many DIY guides suggest using sandpaper, this can be overly abrasive and damage the soft metal of the thermocouple. A gentler approach is recommended. You want to remove the carbon, not scratch the metal itself. Using a piece of steel wool, a dry microfiber cloth, or even the rough side of a kitchen sponge is often sufficient to gently scrub the tip clean and restore proper thermal contact.
If a gentle cleaning doesn’t solve the issue, you might consider replacing the part. It’s an accessible DIY job for many. While the cost to replace the thermocouple professionally is $100 to $325 in many areas, the part itself is inexpensive. A new thermocouple can often be purchased at any local hardware store for under $15, making it a cost-effective repair if you’re comfortable with the process. A typical thermocouple can last for about 10 years, but its lifespan can be shorter in high-use appliances.
Your Action Plan: Safely Cleaning the Thermocouple
- Turn Off the Gas: Shut off the gas control valve on the water heater and, for extra safety, the main gas shutoff valve near the appliance.
- Loosen the Connections: Use an appropriate wrench to carefully loosen the nut holding the thermocouple to the gas control valve.
- Remove from Assembly: Gently pull the thermocouple out of its bracket in the pilot assembly. You may need a screwdriver.
- Clean the Tip: Gently clean the top 1/2 inch of the thermocouple tip using a microfiber cloth or fine steel wool to remove any carbon buildup. Avoid aggressive sandpaper.
- Reassemble and Test: Re-insert the thermocouple, tighten the connections (see section on threading pitfalls), and attempt to relight the pilot according to the manufacturer’s instructions.
Pilot Flame: Why Is Alignment with the Thermocouple Critical?
Even with a perfectly clean thermocouple and a steady gas supply, your pilot light can still fail if the flame isn’t positioned correctly. The system relies on a precise “thermal signature.” The thermocouple needs to be engulfed in the hottest part of the pilot flame to generate its maximum voltage. If the flame is weak, flickering, or misaligned, it may only lick the side of the sensor, providing insufficient heat.
According to plumbing experts, the ideal placement for a thermocouple tip is approximately 1/8 to 1/4 inch within the pilot flame. The flame should be a strong, steady blue colour and should visibly “wrap around the thermocouple bulb,” ensuring a constant and intense heat transfer. A lazy, yellow, or flickering flame indicates a problem that needs to be addressed, as it won’t provide the necessary heat and may also be a sign of poor combustion.
The colour of the pilot flame is a primary diagnostic tool for any technician. It tells you about the health of the combustion process. The table below outlines what to look for and what action to take, helping you diagnose the problem before you even touch the thermocouple.
| Flame Color | Condition | Action Required |
|---|---|---|
| Blue | Working correctly | No action needed |
| Yellow or Red | Indicates a problem | Clean pilot orifice or call technician |
| Flickering | Erratic movement means something is wrong | Check for drafts or thermocouple alignment |
If you see a yellow or flickering flame, the issue might not be the thermocouple at all, but a dirty pilot orifice that is restricting gas flow or a draft that is disturbing the flame. Addressing these root causes is essential for a reliable, long-term fix.
Gas Fireplace: Which Part to Change When the Remote No Longer Responds?
While this guide focuses on water heaters, the principles of gas appliances often overlap. A common issue with modern gas fireplaces is a non-responsive remote control. Before assuming a major component has failed, the troubleshooting process should always start with the simplest solutions. The problem often lies within the remote system’s power supply, not the gas components themselves.
Here are the first steps to take:
- Check the remote control batteries. This is the most common fix.
- Verify the receiver module batteries. Most gas fireplaces have a receiver box, often located in a tray at the base of the unit, which also runs on batteries. These are frequently overlooked.
- Attempt to re-pair the remote. Consult your fireplace’s user manual for the specific “re-sync” or “learn” procedure to re-establish the connection between the remote and the receiver.
If these simple steps fail, the problem could be a faulty receiver module or an issue with the gas valve it controls. At this point, it is crucial to stop and recognize the limits of DIY work in Quebec. As a certified technician, I must emphasize this critical safety regulation:
In Quebec, any work on a gas appliance’s burner or gas valve MUST be performed by a technician certified by the CMMTQ (Corporation des maîtres mécaniciens en tuyauterie du Québec).
– Quebec regulatory requirement, CMMTQ Professional Standards
This regulation exists to protect you and your home. Working on gas lines or main control valves without the proper training and tools is extremely dangerous. If the basic battery and re-pairing steps don’t resolve your remote issue, your next and only step should be to contact a CMMTQ-certified professional.
Changing a Universal Thermocouple: Threading Pitfalls to Avoid
If you’ve determined that your thermocouple has failed and you’re comfortable with the replacement, the process is generally straightforward. Universal thermocouples are available at most hardware stores and come with several adapters to fit different gas valves. However, there is one critical step where many DIY attempts go wrong: reattaching the new thermocouple to the gas control valve.
The threads on both the thermocouple nut and the gas valve housing are typically made of soft brass. It is incredibly easy to cross-thread or over-tighten these fittings, stripping the threads and ruining an expensive gas valve. A simple thermocouple replacement that should be a minimal cost fix can quickly turn into a $500+ professional gas valve replacement if this step is done incorrectly.
This photograph illustrates the careful, manual technique required. The focus is on tactile feedback from the fingers, not brute force from a wrench.
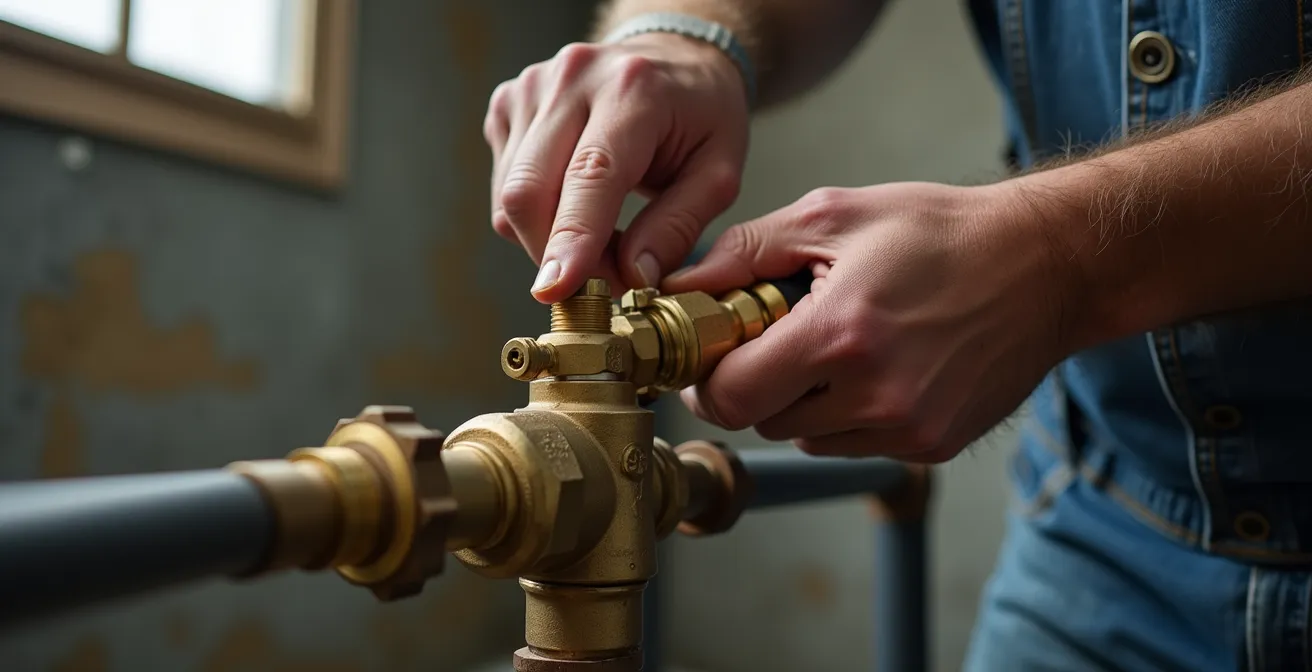
To avoid this costly mistake, follow the technician’s rule of thumb. As Canadian restoration experts advise, you should always start the connection by hand. Thread the nut into place with your fingers only until it is hand-tight. You should feel no resistance. If you do, back it out and try again. Once it is fully seated by hand, use a small wrench to give it a final, gentle tightening of no more than a quarter to a half revolution. This provides a secure, gas-tight seal without any risk of stripping the soft brass threads.
Combustion Air Intake: Why Should It Never Be Blocked by Snow?
A gas appliance requires a steady, uninterrupted supply of fresh air to burn fuel safely and efficiently. This is the “air” part of the fundamental combustion triangle (Air, Fuel, Heat). Many modern, high-efficiency water heaters and furnaces in Quebec are direct-vent or power-vent systems, which use two PVC pipes running to the exterior of the house: one for exhaust and one for fresh air intake.
During a Quebec winter, it’s easy for heavy snowfall, drifting snow, or falling ice to completely block these vents. When the air intake is obstructed, the appliance is starved of oxygen. This leads to poor combustion, which can cause the pilot light to flicker and go out as the system’s sensors detect an unstable flame. More dangerously, it can lead to the production of carbon monoxide (CO), a colourless, odourless, and deadly gas. Your water heater going out might be the first, safest sign of a very dangerous blockage.
Regularly checking your exterior vents is a critical winter maintenance task for any Quebec homeowner with a gas appliance. Here is a simple checklist to follow after any significant snowfall:
- Know Your Vents: Locate your intake and exhaust vents on the exterior of your home *before* winter starts.
- Clear Snow and Ice: After every storm, clear a wide area around the vents to ensure airflow is not impeded.
- Check for Ice Dams: Dripping condensate from the exhaust vent can freeze and create an ice dam that blocks the pipe from below. Carefully chip away any ice buildup.
- Install CO Detectors: Ensure you have a working carbon monoxide detector on every floor of your home, especially near sleeping areas.
- Schedule Annual Maintenance: A certified technician can inspect and clean your entire vent system as part of a fall tune-up.
Oil Smell in the House: Is It Normal at Startup or a Dangerous Leak?
While natural gas is common, many homes in Quebec still rely on heating oil (mazout). The smells associated with these two fuels signify very different levels of danger and require different responses. It’s crucial for every homeowner to know which fuel their home uses and how to react to an unusual odour.
A natural gas leak is identified by a distinct “rotten egg” or sulphur smell. This odour is an additive called mercaptan, put in the gas specifically to act as a warning agent. If you smell this, the situation is an immediate emergency. You must evacuate the house immediately without using any phones, light switches, or creating any sparks. From a safe distance, call 911 and your gas provider, Énergir.
An oil smell is different. It’s often described as being similar to diesel fuel or kerosene. A faint, brief whiff of this odour when your furnace first kicks on for the season can be normal; it’s often just dust or residual oil burning off the heat exchanger. However, a strong, persistent oil smell is not normal and indicates a potential leak in the tank, fuel lines, or the burner itself. While not as explosive as a gas leak, it is still a serious situation that requires immediate action. You should ventilate the area by opening windows, shut off the furnace if possible, and call your oil service company for an emergency inspection.
Key Takeaways
- The thermocouple is a safety device first, a component second. When it fails, it’s often protecting you from a larger issue like poor combustion or a lack of air.
- A healthy pilot flame is steady and blue, and must be perfectly aligned to wrap around the thermocouple tip to generate enough electricity.
- In Quebec, any work on a gas valve or burner must be done by a CMMTQ-certified technician. DIY repairs should be limited to simple cleaning and battery replacement.
How Does a 96% Efficiency Gas Furnace Save You Money on Energir Bills?
The constant, year-round operation of a traditional pilot light, while small, contributes to your energy bill. A constantly running pilot light can cost Quebec homeowners approximately $7-10 per month, which adds up to over $100 per year just to keep a tiny flame alive. Modern high-efficiency appliances eliminate this standby energy waste entirely.
A 96% AFUE (Annual Fuel Utilization Efficiency) furnace or a modern water heater with electronic ignition does not have a standing pilot light. Instead, it uses an electronic igniter (like a spark plug or a hot surface igniter) to light the gas only when there is a call for heat. Once the heating cycle is complete, the entire system shuts down, consuming no gas until it’s needed again. This move from a constantly-on system to an on-demand system is a major source of energy savings.
Upgrading from an old, mid-efficiency appliance with a pilot light to a modern high-efficiency or tankless model can have a significant impact on your household expenses. Depending on your hot water usage, studies show that switching to a new tankless or hybrid heat pump water heater reduces energy costs by 8% to 34%. This translates into real, noticeable savings on your monthly Énergir bill.
| System Type | Monthly Cost | Annual Cost | Efficiency Impact |
|---|---|---|---|
| Traditional Pilot Light | $7-10 | $84-120 | Less efficient as fuel source needed to constantly keep it lit |
| Electronic Ignition | $0 | $0 | No pilot light needed, ignition is electronic |
While the upfront cost of a new high-efficiency appliance is higher, the long-term savings on your energy bill, combined with improved safety and reliability, make it a worthwhile investment for many Quebec homeowners.
If you have followed these diagnostic steps and your pilot light still won’t stay lit, or if you feel uncomfortable performing any of these tasks, the safest and most effective next step is to contact a professional. An experienced, CMMTQ-certified technician can perform a full system diagnostic to identify the root cause and ensure your appliance is operating safely and efficiently.
Frequently Asked Questions About Gas and Oil Odors
What should I do if I smell natural gas (rotten eggs/mercaptan)?
Evacuate immediately without using phones or light switches. Call 911 and Énergir from outside the home.
What if I smell oil/mazout (diesel-like odor)?
A brief odor at startup can be normal. A strong, persistent smell indicates a leak – ventilate the area and call your oil service company.
How can I tell which fuel my home uses?
Check your utility bills, look for gas meters vs oil tanks, or contact your local utility provider for confirmation.