Contrary to marketing claims, a heat pump’s advertised COP is almost meaningless for a Montreal winter at -30°C.
- True performance is hidden in technical data sheets revealing output at -15°C and -25°C, not in the standard ratings.
- Quebec-specific installation errors—like incorrect height and lack of ice protection—can disable even the best machine.
Recommendation: Stop looking at brochures and start demanding technical performance data at extreme cold temperatures before you even consider a quote.
For any Montreal resident, the promise of a single, efficient heating system that can stand up to the brutal depths of a -30°C cold snap is the ultimate goal. The market is flooded with heat pumps, all brandishing impressive Coefficient of Performance (COP) ratings and promising year-round comfort without the need for auxiliary heating. Yet, the lived experience for many is a system that sputters, struggles, and ultimately fails to deliver when the polar vortex descends, leaving them cold and questioning their investment. The reliance on baseboard heaters kicks in, and energy savings evaporate.
The common advice is to look for a “cold climate” model or check the HSPF2 rating. While not wrong, this is dangerously incomplete. It ignores the fundamental disconnect between laboratory testing conditions and the harsh reality of a Quebec winter. The true measure of a heat pump isn’t a single number on a sticker; it’s a combination of its verified deep-cold performance, its resilience against specific environmental assaults like snow and ice, and an installation that anticipates these very challenges.
But what if the key wasn’t in finding a magic number, but in learning how to technically audit a machine’s capabilities yourself? This guide is built for the critical homeowner who refuses to rely on marketing fluff. We will dissect the technical data that manufacturers often obscure. We will expose the common, costly installation mistakes specific to our climate and provide the framework to select a machine that not only works, but thrives, when the thermometer plummets.
This article provides a detailed roadmap to navigate the complexities of choosing a truly winter-proof heat pump. From deciphering performance metrics to understanding the nuances of proper installation and maintenance in Quebec, you’ll gain the critical knowledge to make an informed, data-driven decision.
Summary: A Technical Guide to Choosing a Heat Pump for Montreal’s Extreme Cold
- Coefficient of performance at -20°C: why most ads are misleading?
- Your heat pump is smoking and noisy in winter: is it normal or a malfunction?
- The ground installation error that buries your heat pump under the snow
- Wall-mounted or central heat pump: which heats a multi-story house better?
- Heat pump protective cover: useless accessory or vital investment?
- Clogged coils: how does dust reduce your heat pump’s efficiency by 30%?
- Antifreeze sillcock vs. standard: which to install to avoid a flood in the spring?
- List of eligible heat pumps: how to avoid buying a non-subsidized model?
Coefficient of Performance at -20°C: Why Most Ads Are Misleading?
The Coefficient of Performance (COP) is the most frequently advertised metric for heat pump efficiency. It represents the ratio of heat produced per unit of electricity consumed. A COP of 3 means the unit produces 3 kWh of heat for every 1 kWh of electricity used. The problem is that this number is highly dependent on the outdoor temperature. The impressive figures you see in brochures are almost always measured at a mild 8°C. This is a fundamentally deceptive benchmark for a Montreal homeowner concerned about performance at -20°C or -30°C.
As temperatures plummet, so does the COP. The air contains less heat for the unit to extract, forcing the compressor to work much harder. In fact, Natural Resources Canada data shows that while COPs can range from 2.0 to 5.4 at 8°C, they can drop to as low as 1.1 to 3.7 at just –8°C. At -20°C, many standard models approach a COP of 1.0, meaning they are no more efficient than a simple electric baseboard heater. This is the performance reality that matters.
Furthermore, field data from Montreal HVAC installers highlights a critical issue: even high-quality cold-climate units can fail if not sized correctly for Quebec’s humid cold, which triggers more frequent and energy-intensive defrost cycles than laboratory tests account for. One installer reports cases where homeowners were left with indoor temperatures of only 16°C when it was -25°C outside, precisely because the chosen unit’s real-world capacity at that temperature was a fraction of its advertised rating. To avoid this, you must become a technical auditor.
Your Action Plan: Verifying Real Cold-Weather Performance
- Demand the Data Sheet: Request the manufacturer’s detailed performance data sheet. It must show COP and heating capacity (BTU/h) at multiple temperatures, specifically -15°C and -25°C.
- Analyze the Capacity Drop: Compare the heating capacity (BTU/h) at the rated temperature (e.g., 8°C) versus at -20°C. Expect a significant drop, but a top-tier model will retain more capacity.
- Look for NEEP Certification: Check if the model has NEEP Cold Climate certification. This is a crucial third-party validation requiring the unit to maintain at least 70% of its heating capacity at -15°C.
- Calculate the True Cost: Factor in Hydro-Québec’s tiered electricity rates. A unit that struggles and runs constantly in deep cold will push you into the higher-cost tier, erasing potential savings.
- Verify Subsidy Eligibility: Before purchasing, confirm the model’s performance at -8°C qualifies it for maximum rebates from programs like LogisVert, which can be as high as $120 per 1,000 BTU/h produced at that temperature.
Your Heat Pump Is Smoking and Noisy in Winter: Is It Normal or a Malfunction?
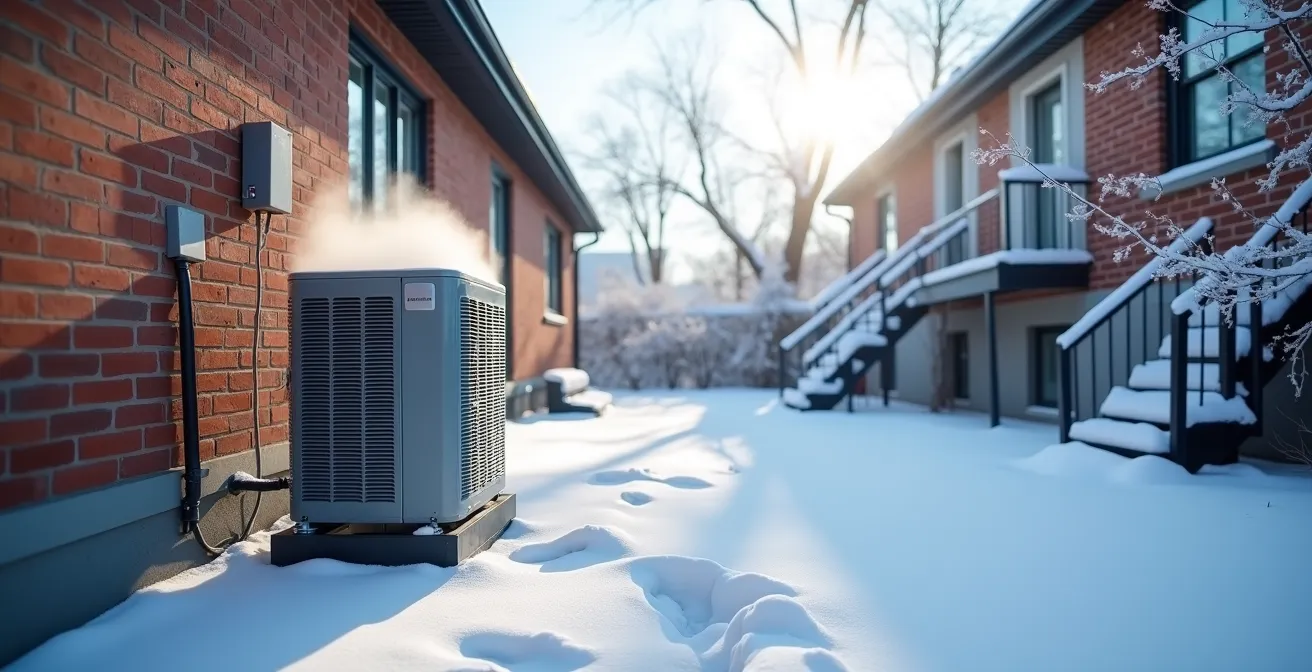
A new heat pump owner’s first winter can be alarming. The outdoor unit, which was silent all summer, suddenly starts making strange noises and, most worryingly, emitting large plumes of what looks like smoke. In most cases, this is not only normal but a sign that the machine is working correctly. This process is the defrost cycle. When extracting heat from cold, humid air, frost and ice inevitably build up on the outdoor unit’s coils. This ice acts as an insulator, drastically reducing efficiency. To combat this, the heat pump temporarily reverses its operation, sending hot refrigerant gas through the outdoor coils to melt the ice. The “smoke” is actually steam from the melting ice hitting the warm coils.
This process is essential for maintaining performance in a Quebec winter. However, it’s crucial to distinguish between the normal sounds and sights of a healthy defrost cycle and the warning signs of a genuine malfunction. A normal defrost cycle is typically short, lasting 5 to 10 minutes, and is accompanied by a “whoosh” of reversing refrigerant and the sight of dissipating steam. Abnormal symptoms, like the unit remaining encased in a block of ice *after* a cycle or persistent metallic grinding sounds, indicate a problem that requires professional attention.

Observing the unit’s behavior provides vital clues to its health. The image above captures the dramatic, yet perfectly normal, release of steam during an effective defrost cycle. Understanding what to look, listen, and even smell for can save you from an unnecessary service call or, conversely, alert you to a developing issue before it causes major damage. A burning smell, for instance, is never normal and requires an immediate shutdown of the system.
- NORMAL SOUNDS: A brief ‘whoosh’ as the defrost cycle starts, a gurgling sound from refrigerant flow, and the low hum of the fan motor are all expected.
- ABNORMAL SOUNDS: Persistent metallic grinding, a high-pitched squeal, loud banging, or continuous clicking are signs of mechanical issues.
- NORMAL SIGHTS: A large plume of steam that disappears quickly, a thin layer of white frost on the coils between cycles, and water dripping from the unit are all part of normal operation.
- ABNORMAL SIGHTS: If the unit remains encased in thick ice after a defrost cycle, fails to produce any steam in cold weather, or shows oil stains around it, it’s a red flag.
The Ground Installation Error That Buries Your Heat Pump Under the Snow
You can purchase the most advanced, expensive cold-climate heat pump on the market, but one simple installation mistake can render it useless: installing it too close to the ground. In a Montreal winter, snow accumulation is not a possibility; it’s a certainty. A heat pump buried in snow cannot function. The snow blocks airflow to the coils, preventing the unit from extracting heat from the air. Worse, it traps moisture from the defrost cycle, which then refreezes, encasing the unit in a solid block of ice and potentially causing severe damage to the fan and coils.
The minimum installation height is not a suggestion; it’s a critical specification dictated by regional climate data. While a generic installation guide might suggest 12 inches, snow accumulation data for the Montreal area indicates a minimum stand height of 24 to 36 inches is required. This ensures the unit remains well above the expected snowpack, even after major storms and subsequent drifting. The location of the unit also plays a significant role. A unit placed in a narrow alley between houses, where wind-driven snow piles up, requires a greater height than one in an open backyard.
Proper drainage is the other half of the equation. During the defrost cycle, the unit can produce a significant amount of water. This water must be directed away from the unit’s base and the home’s foundation. If it pools and freezes, it can create a growing ice dam that eventually engulfs the machine. A qualified Quebec installer will not only mount the unit on a sturdy, sufficiently high stand but also ensure the ground beneath it is graded for proper drainage, often creating a gravel bed to help dissipate the water.
| Installation Location | Minimum Height | Key Consideration | Drainage Requirement |
|---|---|---|---|
| Open backyard | 24 inches | Standard snow accumulation | 5% slope away from unit |
| Between houses (alley) | 36+ inches | Wind drift accumulation | Heated drain pan recommended |
| Under roof edge | 36 inches + shelter | Ice fall protection needed | Extended drainage path |
| North-facing wall | 30 inches | Slower snow melt | Gravel bed drainage |
Wall-Mounted or Central Heat Pump: Which Heats a Multi-Story House Better?
The architecture of a home is a determining factor in choosing the right type of heat pump system. Montreal’s diverse housing stock, from open-concept modern bungalows to compartmentalized, multi-story greystones and plexes, presents very different heating challenges. A solution that works perfectly for one can be highly inefficient for another. The core issue is air circulation. A central heat pump relies on a network of ducts to distribute conditioned air throughout the house. A wall-mounted (or “ductless”) system uses individual heads in different rooms or floors.
A comparative analysis of typical Quebec housing illustrates this choice perfectly. For a modern, open-concept bungalow in Brossard with existing, well-designed ductwork, a single, high-efficiency central heat pump is the ideal solution. It can leverage the existing infrastructure to provide even, whole-home comfort with superior efficiency. In this scenario, Hydro-Québec confirms that heat pumps can be up to 3 times more efficient than the electric baseboards they often replace.
Conversely, consider a 120-year-old, compartmentalized greystone in Westmount. These homes often feature multiple distinct floors, high ceilings, and poor natural air circulation between rooms, exacerbated by steep, narrow staircases. Installing a central system would be prohibitively expensive and invasive, requiring the installation of extensive ductwork. Here, a multi-zone wall-mounted system is far superior. By placing an individual head on each floor, it overcomes the home’s structural barriers to airflow, allowing for targeted heating and individual temperature control. This strategy provides comfort where it’s needed without trying to force air through a structure not designed for it.

The choice is not about which technology is inherently “better,” but which is best suited to the home’s physical reality. For older, multi-level homes common in Montreal, a multi-head ductless system often provides a more effective and efficient heating solution than trying to retrofit a central system. It respects the home’s character while delivering modern comfort.
Heat Pump Protective Cover: Useless Accessory or Vital Investment?
The term “heat pump cover” often conjures images of the fabric enclosures used to protect air conditioning units in the summer. Using such a cover on a heat pump in winter is a catastrophic mistake. It traps moisture, prevents airflow, and can lead to severe corrosion and mechanical failure. However, a “heat pump shelter” or “roof” is an entirely different and, in many Quebec installations, a vital investment. Its primary purpose is not to protect the unit from snow, but from the destructive force of falling ice and roof avalanches.
The financial risk is real and substantial. A documented case from a Quebec installation illustrates the danger: a large icicle fell from a second-story roofline, completely destroying the outdoor unit’s fan motor and piercing the delicate coil. The result was a $4,000 repair bill. This preventable damage starkly contrasts with the approximate $350 cost of a professionally installed protective shelter. For any unit installed beneath a roofline, a shelter is not an accessory; it’s essential insurance against a common and costly winter hazard.
A proper shelter must be designed to protect without impeding performance. This means it must not obstruct airflow. Key design specifications include:
- Ample Clearance: There must be a minimum of 3 feet of clearance between the top of the heat pump’s fan discharge and the underside of the shelter to allow air to escape freely.
- Open Sides: All sides of the unit must remain completely open. The structure should be a roof, not an enclosure.
- Sloped Roof: The shelter’s roof should be sloped to direct falling snow and ice away from the unit, not onto it.
- Rigid Materials: The shelter should be constructed from sturdy, rigid materials like metal or polycarbonate that can withstand the impact of falling ice and will not trap moisture.
In the context of a harsh Quebec winter, a properly designed and installed shelter transitions from a “nice-to-have” to a critical component of the system’s longevity and reliability. It is a small upfront cost that mitigates a significant and foreseeable financial risk.
Clogged Coils: How Does Dust Reduce Your Heat Pump’s Efficiency by 30%?
While external threats like snow and ice are obvious, an insidious, invisible enemy is constantly working to reduce your heat pump’s efficiency: dirt. The outdoor unit’s coils are covered in thousands of delicate aluminum fins, designed to maximize contact with the air. When these fins become clogged with dust, pollen, cottonwood fluff, and leaves, it’s like throwing a blanket over the unit. Air cannot pass through freely, and the heat exchange process is severely hampered. This forces the compressor to run longer and harder to achieve the desired temperature, consuming more electricity and causing premature wear and tear.
The efficiency loss is not trivial. While the exact percentage varies, a dirty unit can easily see its performance degrade significantly. The impact is most noticeable during the shoulder seasons and deep winter, where every bit of efficiency counts. By contrast, a well-maintained unit can perform admirably even in challenging conditions. For example, data shows that properly maintained heat pumps achieve a COP of 2.3 even at a chilly -8.3°C, demonstrating the potential that is lost to simple neglect. The single most important factor in keeping outdoor coils clean is, counterintuitively, the indoor furnace filter. A clogged indoor filter restricts airflow, causing the indoor coil to get dirty, which in turn predicts a dirty outdoor coil.
Regular cleaning is essential, and the maintenance schedule should be adapted to Quebec’s specific seasonal challenges. A simple hosing-down can make a world of difference, but timing is everything. Hosing off the unit in the fall before the first wet snow, for example, prevents a thick, hard-to-remove mat of wet leaves from forming.
Your 4-Season Quebec Maintenance Calendar
- SPRING (May): After trees have finished dropping their seeds, gently hose off the coils to remove accumulated pollen and maple ‘helicopter’ seeds.
- EARLY SUMMER (June): In areas with cottonwood trees, check the unit weekly and remove the “summer snow” fluff, which can quickly form a dense blanket on the coils.
- FALL (October): Before the first wet snow, clear all fallen leaves from on and around the unit to prevent a wet, frozen mat from forming.
- WINTER (Monthly): After major storms, check to ensure the unit is not blocked by snow drifts. Periodically inspect for any unusual ice buildup that a defrost cycle hasn’t cleared.
- YEAR-ROUND (Monthly): Check and clean or replace your indoor furnace/air handler filter. This is the #1 preventative maintenance task for the entire system.
Antifreeze Sillcock vs. Standard: Which to Install to Avoid a Flood in the Spring?
While your focus may be on the advanced technology of the heat pump itself, overlooking a simple piece of plumbing can lead to one of the most common and costly winter-related disasters for a homeowner: a burst pipe. Specifically, the outdoor water faucet, or sillcock. A standard sillcock has its valve right at the exterior wall, exposed to freezing temperatures. If any water is trapped inside—often because a hose was left connected—it will freeze, expand, and rupture the pipe inside the wall. The damage often goes unnoticed until the spring thaw, when the thawed pipe begins to flood the basement or crawlspace.
This is a particularly high-risk issue in Quebec, where the building codes recognize that the frost line can be 4 to 5 feet deep, subjecting unprotected pipes to prolonged, intense cold. The solution is to install an antifreeze (or “frost-proof”) sillcock. This device has a long stem that places the actual shut-off valve deep inside the warm, insulated part of the house. When you turn the handle outside, you are closing a valve located 6 to 12 inches inside the wall, ensuring no water is left in the portion of the pipe exposed to the cold.
The cost difference between the two options is minimal compared to the potential damage. A real-world cost analysis highlights the clear economics: installing a standard sillcock might cost around $75, while an antifreeze model is closer to $200. That $125 difference is negligible when compared to the average cost of a non-catastrophic basement flood restoration in Montreal, which often exceeds $5,000. The antifreeze sillcock provides near-certain protection against the most common winterization mistake—forgetting to disconnect the garden hose—making it an essential upgrade for any home in a cold climate.
Key Takeaways
- Ignore advertised COP ratings; demand technical data sheets showing performance at -15°C and -25°C to see a unit’s true winter capability.
- A correct installation in Quebec is non-negotiable: ensure the unit is raised 24-36 inches off the ground and protected by a proper shelter from falling ice, not a fabric cover.
- Maximizing subsidies requires verification. Ensure your chosen model is on the eligible lists for both federal and Hydro-Québec programs like LogisVert before you sign a contract.
List of Eligible Heat Pumps: How to Avoid Buying a Non-Subsidized Model?
After navigating the technical maze to identify a heat pump that can genuinely handle a Montreal winter, the final step is to ensure your choice is financially sound. The federal and provincial governments offer significant rebates to encourage the adoption of high-efficiency heat pumps, but these programs have strict technical requirements. Purchasing a model that is not on the official eligibility list means leaving thousands of dollars on the table. It is absolutely critical to verify eligibility before signing any contract.
The two main programs for Quebec homeowners are the federal Canada Greener Homes Grant and Hydro-Québec’s LogisVert program. These programs can often be “stacked” for maximum savings. For instance, the Hydro-Québec’s LogisVert program offers up to $120 per 1,000 BTU/h of heating capacity at -8°C for the most efficient models. To qualify, a heat pump must meet specific ENERGY STAR Cold Climate criteria, including a minimum HSPF2 rating and a minimum COP at a specified cold temperature. The official, searchable lists of eligible products are maintained by Natural Resources Canada.
The most critical and often-missed requirement does not concern the equipment, but the installer. To receive provincial rebates, the installation must be performed by a contractor who is certified by Rénoclimat. Hiring an uncertified installer, even if they install an eligible model perfectly, will result in your rebate application being denied. Therefore, your final verification process must be a two-step check: is the specific model number on the list, and is the installer Rénoclimat-certified?
- Verify ENERGY STAR Cold Climate Criteria: Ensure the heat pump you’re considering meets the baseline technical requirements (e.g., HSPF2 ≥ 10, COP ≥ 1.8 at -8.3°C).
- Apply for the Canada Greener Homes Grant: This federal program can provide up to $5,000, but requires an EnerGuide evaluation both before and after the installation.
- Stack with Hydro-Québec’s LogisVert Program: This provincial rebate is based on the unit’s performance and can be combined with the federal grant.
- Check for Municipal Programs: Some municipalities offer additional top-up rebates; check your local city’s website for any available programs.
- CRITICAL – Certify Your Installer: Before signing anything, verify that your chosen installation company holds a valid Rénoclimat certification. Without this, you will not receive provincial grants.
Armed with this technical and financial knowledge, you are no longer a passive buyer but an empowered auditor. The next step is to use this framework to challenge the quotes you receive. Do not accept a proposal that doesn’t include the manufacturer’s technical data sheet. Question your installer about stand height, drainage plans, and shelter design. Verify their Rénoclimat certification yourself. By taking control of the process, you can confidently invest in a heating system that will deliver on its promise of efficient comfort, even at -30°C.