For a Quebec homeowner, radiant floor heating is worth the investment only if you approach it as ‘thermal resilience engineering’, not just a comfort upgrade.
- Hydronic systems embedded in concrete create a ‘thermal battery’, providing stable, efficient heat that outsmarts Quebec’s extreme cold and volatile electricity rates.
- System survivability during a power outage depends critically on choosing PEX tubing and the right glycol-to-water ratio for deep freeze protection.
Recommendation: Prioritize a hydronic system for whole-basement projects and focus design choices on resilience and long-term operating costs over initial installation price.
Every Quebec homeowner knows the feeling: that damp, bone-chilling cold that seems to radiate from a basement floor, no matter how high you crank the thermostat upstairs. It’s a space full of potential—a future playroom, home office, or family den—held hostage by discomfort. The common solution you’ll hear about is radiant floor heating, a promise of luxurious, toe-warming comfort. But in a climate defined by polar vortexes and ice storms, simply asking if it’s “worth it” misses the point entirely.
The real conversation isn’t about luxury; it’s about resilience. It’s not just about installing a heating system, but about engineering a comfort solution that can withstand a -35°C night and remain efficient when Hydro-Québec’s rates are at their peak. Many guides will discuss the basic trade-offs, but they often overlook the critical details that make a system thrive or fail in our unique environment. This isn’t just about avoiding cold feet; it’s about achieving ‘comfort sovereignty’ in your own home.
This guide re-frames the question. Instead of just weighing costs, we will explore how to design a radiant heating system for maximum thermal resilience. We’ll analyze the crucial decisions—from the type of system and pipe layout to the flooring you choose and the antifreeze you use—that transform your basement from a cold liability into a warm, consistently comfortable, and truly livable asset, no matter what winter throws at you.
To help you navigate these critical choices, this article breaks down the entire process. We’ll explore the fundamental differences between systems, the best installation practices for performance and durability, and the strategic decisions that ensure your comfort and peace of mind for decades to come.
Summary: A Homeowner’s Guide to Resilient Radiant Heating in Quebec
- Câble électrique ou tuyaux hydroniques : lequel choisir pour une petite salle de bain ?
- Dalle structurale chauffante : comment attacher les tuyaux PEX avant de couler le béton ?
- Panneaux rainurés ou agrafes sous solives : comment ajouter du radiant sans couler de béton ?
- Céramique, bois ou vinyle : quel plancher conduit le mieux la chaleur radiante ?
- Temps de réponse : pourquoi ne faut-il pas baisser le thermostat d’un plancher radiant la nuit ?
- Mélange glycol 30% ou 50% : quel ratio pour survivre à une nuit à -35°C ?
- Quel tuyau pardonne le mieux si le chauffage coupe en plein hiver ?
- Which High-Efficiency Heating System Is Best for a 1980s Bungalow?
Câble électrique ou tuyaux hydroniques : lequel choisir pour une petite salle de bain ?
When starting a renovation, the first decision point often arises in the smallest room: the bathroom. Here, the choice between an electric or a hydronic (water-based) system is straightforward and primarily driven by cost and scale. For a small, specific area like a bathroom, electric radiant heating is almost always the more practical and cost-effective choice. The installation is significantly simpler and cheaper. A small electric system might cost between $300 to $400 to install, whereas extending a hydronic system for just one small room could cost upwards of $4,000 to $5,000 if the core components aren’t already planned for the rest of the house.
The primary reason for this difference is complexity. Electric systems, whether mats or cables, are self-contained. Hydronic systems require a boiler or water heater, pumps, and a manifold to distribute the hot water. While a hydronic system is far cheaper to operate for a large area, the high upfront cost for a small room doesn’t make financial sense. For a full basement, research from Alpine Credits shows that hydronic systems cost as little as 30 cents per square foot per month to run, but that efficiency is lost when the infrastructure only serves a tiny footprint.
This comparative table from Centris.ca, a key resource for Quebec real estate, clearly illustrates the installation cost disparity. It highlights why electric is the go-to for targeted warmth in smaller spaces.
| System Type | Installation Cost | Best For | Key Feature |
|---|---|---|---|
| Electric Cable | $800-$1,000 per 100 ft² | Small bathrooms | Easy retrofit installation |
| Electric Mat | $1,000-$1,400 per 100 ft² | Right-angle rooms | Quick unroll installation |
| Hydronic | $5-$6.50 per ft² | Large areas | Lower operating costs |
Ultimately, think of it as a strategic choice. Use electric systems for surgical comfort strikes in small zones like a bathroom or entryway. For the grand project of an entire basement, the economic and performance equation flips dramatically in favour of a hydronic system, which we’ll explore next.
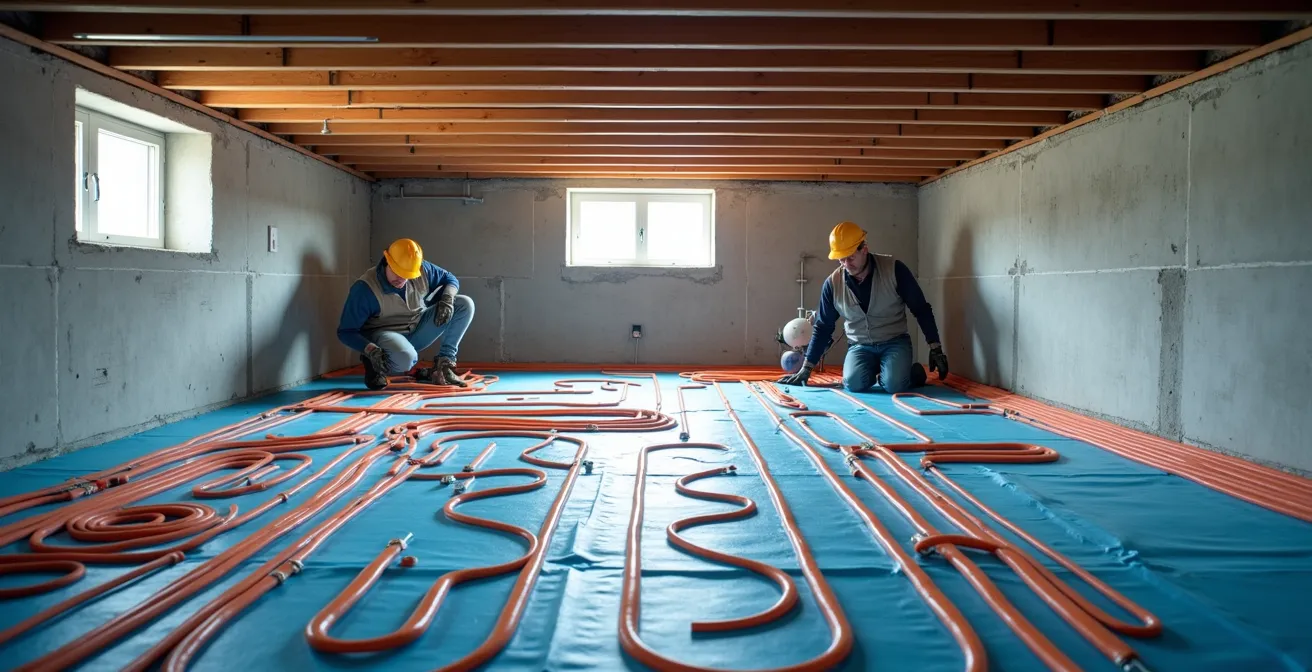
Dalle structurale chauffante : comment attacher les tuyaux PEX avant de couler le béton ?
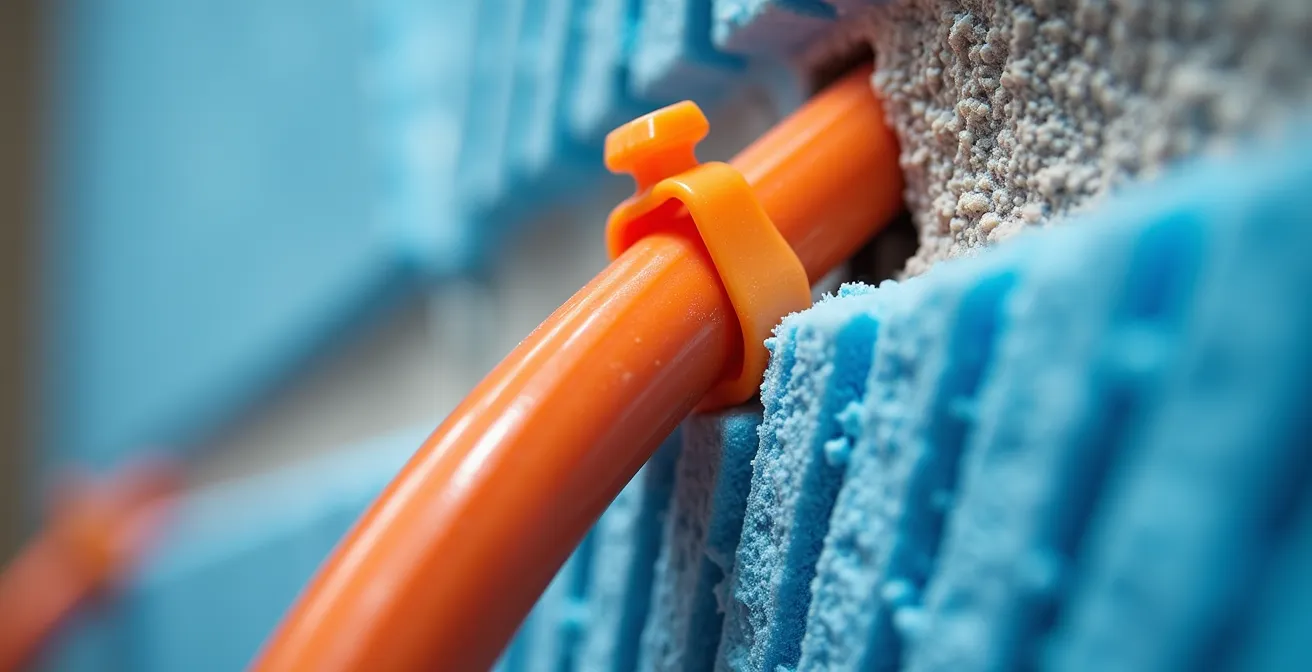
For a new basement finish, embedding hydronic PEX tubing directly into a concrete slab is the gold standard for creating a resilient and efficient heating system. This method transforms your entire floor into a massive, slow-release “thermal battery” that provides unparalleled, stable comfort. However, the success of this installation hinges on meticulous preparation before the concrete truck ever arrives. The most critical step is properly securing the PEX tubing to ensure it doesn’t shift, float, or get damaged during the pour.
There are two primary professional methods for securing the tubing: tying it to a wire mesh grid or clipping it directly to the rigid foam insulation below. The choice often depends on the contractor’s preference and whether a wire mesh is already required for structural reasons. Regardless of the method, the layout is paramount. Tubing should be laid in a serpentine pattern, with courses spaced about 6 to 8 inches apart to provide even heat distribution without creating hot or cold spots. It’s vital to avoid kinking the pipe, as this creates a weak point that can fail under pressure.
The image below shows the precise nature of this work, with PEX tubing carefully clipped to the insulation board, ready for the pour. This visual underscores the importance of a neat and organized layout for optimal performance.
Before any concrete is poured, a crucial quality control step is the pressure test. The entire PEX network is filled with air or water and pressurized to a level specified by the manufacturer. This test must be maintained for a set period (often 24 hours) to confirm there are absolutely no leaks in the system. Pouring concrete over an untested system is a recipe for a catastrophic and impossibly expensive failure. Once the test is passed, the concrete can be poured, ensuring at least 1.5 to 2 inches of coverage over the top of the tubing to create the ideal thermal mass.
Your PEX-in-Slab Pre-Pour Checklist
- Insulate Downward: Install R-5 to R-10 rigid foam insulation board beneath where pipes will be laid to drive heat upward, not into the ground.
- Lay Out Tubing: Lay PEX tubing with 6- to 8-inch spacing between courses, avoiding any sharp bends or kinks that could restrict flow.
- Secure the Network: Fasten the tubing securely to the foam panels with specialized clips or tie it to the wire mesh grid every 18-24 inches.
- Conduct Pressure Testing: Pressurize the entire PEX network according to manufacturer specifications and hold the pressure to verify the system is 100% leak-proof.
- Pour with Care: Pour the concrete slab, ensuring a minimum of 1.5 to 2 inches of coverage above the tubing to create the necessary thermal mass.
Panneaux rainurés ou agrafes sous solives : comment ajouter du radiant sans couler de béton ?
What if you want the comfort of hydronic radiant heat in an existing basement without the massive project of pouring a new concrete slab? Fortunately, there are “dry” installation methods that allow you to retrofit radiant heat effectively. The two most common approaches are using pre-manufactured grooved panels laid on top of the subfloor or stapling the PEX tubing from below, between the floor joists. These methods are essential for renovations where the existing slab is staying in place.
Grooved panels are essentially plywood or OSB subfloor panels with channels routed into them for the PEX tubing to snap into. Aluminum heat transfer plates are often fitted into these grooves to help spread the heat more evenly across the floor surface. This method is effective and raises the floor height only minimally (typically by the thickness of the panel, around 3/4 inch). The final flooring is then installed directly on top of these panels. Alternatively, in a “staple-up” or “suspended tube” installation, the PEX tubing is attached to the underside of the main floor’s subfloor, running between the basement ceiling joists. This requires access from below and is often paired with heat transfer plates to direct the warmth upward.
While these methods avoid a concrete pour, they are still a significant undertaking, with according to Heat-Sheet industry data, a typical installation for a 1,500 sq ft basement costing between $10,000 and $15,000. So why make such an investment? As the experts from This Old House note, it’s about transforming the space into a truly functional part of your home. Legendary plumbing expert Richard Trethewey states it best:
Any basement that will have a family room, playroom, or workshop should have radiant.
– Richard Trethewey, This Old House
This endorsement underscores the value proposition: radiant heat isn’t just a feature; it’s a foundational element that makes a basement genuinely livable and comfortable, especially in a climate like Quebec’s. Both grooved panels and staple-up methods provide a viable path to achieving this comfort without a new slab, turning a cold lower level into a warm and inviting extension of your home.
Céramique, bois ou vinyle : quel plancher conduit le mieux la chaleur radiante ?
The flooring you choose to install over your radiant system is not just an aesthetic decision; it’s a critical component of the system’s performance. Different materials conduct heat with varying degrees of efficiency. The best choices are materials with low thermal resistance, allowing warmth to pass through easily and radiate into the room. In this regard, ceramic tile, stone, and polished concrete are the undisputed champions of heat conductivity.
These dense, solid materials transfer heat quickly and evenly, and they also hold onto that heat, contributing to the overall thermal mass of the floor. This makes them an ideal partner for a radiant system, maximizing both efficiency and comfort. Engineered wood is another excellent choice, specifically designed to be more stable than solid hardwood when exposed to temperature fluctuations. However, not all modern flooring is created equal. Luxury Vinyl Tile (LVT) can be a great option, but it requires due diligence. You must look for planks with a total assembled R-value of less than 1 and, most importantly, confirm that the manufacturer’s warranty explicitly states it is compatible with radiant floor heat and specifies a maximum allowable temperature.
This table, based on data from Quebec-based Soumissions Plancher, provides a clear overview of which materials work best and which should be avoided.
| Flooring Type | Heat Transfer | Suitability | Key Advantage |
|---|---|---|---|
| Ceramic/Stone | Excellent | Highly Recommended | Best heat radiation properties |
| Concrete/Epoxy | Excellent | Recommended | Natural heat transfer qualities |
| Laminate/Carpet | Poor | Not Suitable | Poor heat conductors |
Materials like thick carpet with a heavy underpad are poor choices as they act as insulators, trapping the heat and forcing the system to work harder to warm the room. Laminate flooring can also be problematic due to its construction and potential for off-gassing. Ultimately, pairing a highly conductive floor with your radiant system ensures you get the most comfort and efficiency from your investment.
Temps de réponse : pourquoi ne faut-il pas baisser le thermostat d’un plancher radiant la nuit ?
One of the biggest mistakes new radiant heat owners make is treating their thermostat like they would with a forced-air furnace. With traditional heating, turning the temperature down at night and back up in the morning saves energy. With a hydronic radiant floor, especially one embedded in concrete, this practice is both ineffective and inefficient. The reason lies in the system’s greatest strength: its massive thermal mass. Your concrete slab acts as a “thermal battery,” taking hours to heat up and hours to cool down.
Lowering the thermostat at night forces your system to spend the entire morning working hard just to recharge the “thermal battery” it lost overnight, consuming a large amount of energy in the process. The most efficient way to operate a radiant floor is to “set it and forget it.” Find a comfortable base temperature and leave it there. This allows the system to operate in a steady state, using small, consistent bursts of energy to maintain the floor’s temperature. Counterintuitively, this stability is more economical. In fact, studies show that maintaining 68°F instead of 72°F can achieve a 10% reduction in energy bills, proving that a lower, stable temperature is more efficient than a fluctuating one.
Modern smart thermostats, like the one shown here, are key to optimizing this process. They can be programmed to leverage Quebec’s time-of-use electricity rates, “charging” the floor by running at a slightly higher temperature during off-peak hours overnight, then coasting through the expensive peak morning period. These thermostats use predictive features to learn your floor’s response time, ensuring maximum efficiency.

Think of your floor not as an on-demand heater, but as a slow, steady source of ambient warmth. By resisting the urge to make drastic temperature changes, you work with the system’s design, not against it, resulting in superior comfort and lower operating costs.
Mélange glycol 30% ou 50% : quel ratio pour survivre à une nuit à -35°C ?
For a hydronic system in Quebec, the fluid circulating through the PEX tubes is rarely just water. It’s a mixture of water and propylene glycol, an antifreeze that is absolutely critical for system survivability. During a winter power outage—a scenario every Quebecer is familiar with—the circulator pumps stop, and the fluid in the pipes becomes stagnant. Without antifreeze, that water would freeze, expand, and burst the pipes, leading to a catastrophic failure. The question isn’t whether to use glycol, but what concentration is required to survive a deep freeze.
While a lower concentration of glycol (e.g., 30%) allows for slightly better heat transfer, it doesn’t offer enough protection for the extremes of a Quebec winter. When temperatures plummet to -35°C, you need a more robust solution. For this reason, many experienced Quebec plumbers often recommend a 50% glycol concentration. This provides a freeze protection level well below -35°C, ensuring that even during a prolonged power outage in the dead of winter, the fluid in your pipes will not freeze solid. It may turn into a slush, but it won’t expand and destroy the tubing.
This is a conscious engineering trade-off. A 50/50 mix is slightly less efficient at transferring heat than pure water, meaning the boiler has to work a tiny bit harder. However, this marginal loss in efficiency is a small price to pay for the absolute peace of mind that your entire system is protected against a worst-case scenario. It’s a perfect example of designing for resilience. Choosing the right glycol mix is a non-negotiable insurance policy for your investment, safeguarding your comfort and your home against the harshest elements of our climate.
Quel tuyau pardonne le mieux si le chauffage coupe en plein hiver ?
When engineering for resilience, we must consider material failure. During a severe cold snap and a power outage, what happens to the pipes themselves? This is where the choice of PEX (cross-linked polyethylene) tubing becomes a critical element of system survivability. Compared to rigid pipes like copper or CPVC, PEX is significantly more forgiving in freezing conditions due to its inherent flexibility.
As water begins to freeze and expand, rigid pipes have no choice but to split or burst. PEX, on the other hand, can expand to accommodate the growing ice volume and often return to its original shape once the system thaws. This elasticity is its greatest strength in a cold climate. While no pipe is truly “freeze-proof,” PEX offers a level of forgiveness that rigid pipes simply cannot match. It’s important to note this is about flexibility, not absolute burst strength. A technical report from FlowGuard Gold points out that PEX has a lower short-term burst pressure than CPVC or copper. However, in a freeze scenario, it’s the ability to expand—not the ultimate pressure rating—that prevents a rupture.
Of course, the first line of defense is preventing a freeze altogether. This involves several key resilience strategies. First, all exposed PEX pipes in unheated areas (like a utility room) should be insulated with foam pipe sleeves. Second, for ultimate protection, your system’s design should include a battery backup (UPS) for the circulator pumps. This allows the glycol mixture to continue circulating for a period even after the power goes out, preventing it from stagnating and freezing in the coldest parts of the slab. For longer outages, a generator hookup for the boiler and pumps provides complete comfort sovereignty.
By choosing PEX for its flexibility and supplementing the system with backup power and proper insulation, you create multiple layers of protection. This ensures that even in the most challenging winter conditions, your radiant floor heating system is built to endure.
Key takeaways
- Hydronic systems in a concrete slab offer superior efficiency and comfort for whole basements by creating a ‘thermal battery’.
- Designing for Quebec’s climate means prioritizing system survivability with PEX tubing and a 50% glycol mix for deep freeze protection.
- Operating a radiant floor efficiently requires maintaining a stable temperature, leveraging its thermal mass rather than using nightly setbacks.
Which High-Efficiency Heating System Is Best for a 1980s Bungalow?
When considering a major renovation for a classic Quebec home like a 1980s bungalow, the heating system is a central decision. While options abound, the choice often comes down to two leading high-efficiency technologies: hydronic radiant floors and air-source heat pumps. While heat pumps are an excellent technology, for providing unwavering, deep comfort in a basement, radiant floor heating holds a distinct advantage in our extreme climate. Overall, studies show radiant heating can be up to 30% more efficient than traditional forced-air methods because it eliminates duct losses and heats objects and people directly.
The primary weakness of many air-source heat pumps is their performance in deep cold. As the outside temperature drops towards -25°C or -35°C, their efficiency plummets, and they must rely on inefficient electric resistance coils to supplement the heat. A hydronic radiant floor, powered by a high-efficiency boiler, is completely unaffected by outside air temperature. It delivers consistent, silent, and enveloping warmth, regardless of the polar vortex raging outside. This makes it a more resilient primary heat source for a basement living area.
This comparison table, based on data from Quebec-based Oplus Plumbing, clearly shows the trade-offs. While a hydronic system has a higher initial installation cost, its long-term operating costs are lower and, most critically, its performance is rock-solid at -35°C.
| System | Installation Cost | Operating Cost | Performance at -35°C |
|---|---|---|---|
| Hydronic Radiant | Higher initial | Lower long-term | Consistent heat |
| Air-Source Heat Pump | Moderate | Variable with temperature | Reduced efficiency |
| Hybrid System | Highest | Optimized | Best of both |
For a 1980s bungalow, where the basement is being transformed into a primary living space, investing in a hydronic radiant floor system is an investment in unparalleled comfort and resilience. It provides a foundational warmth that a heat pump, with its fluctuating performance in deep cold, struggles to match consistently.
Ultimately, transforming your basement with radiant heat is a project that pays dividends in comfort and usability for decades. By applying a ‘thermal resilience engineering’ mindset to every decision, you ensure your investment is not just worthwhile, but a true enhancement to your home’s value and your family’s quality of life. For your specific project, the next logical step is to consult with a certified heating designer to create a system tailored to your home’s unique needs.
Frequently Asked Questions About Radiant Floor Heating
Why use glycol instead of just water in Quebec’s climate?
Glycol prevents pipe bursting during power outages in extreme cold, protecting your investment during Quebec’s -35°C winter nights.
How does glycol concentration affect heating efficiency?
Higher glycol concentrations reduce heat transfer efficiency but provide better freeze protection – a necessary trade-off in extreme climates.
When should glycol be replaced in the system?
Most manufacturers recommend testing glycol concentration annually and replacing every 3-5 years to maintain protection and efficiency.