In summary:
- Solving frozen pipes requires treating the crawl space as a complete system, not just insulating the pipes.
- Air sealing, especially at the rim joists, is more critical than simply adding high R-value insulation.
- Closed-cell spray foam is superior in damp, leaky crawl spaces because it acts as an all-in-one air, vapour, and thermal barrier.
- Properly insulating your home’s envelope makes you eligible for significant grants from programs like Rénoclimat.
- A temporary fix can address immediate risk, but a long-term strategy involves bringing the crawl space into the home’s conditioned envelope.
For any owner of an older Quebec home, the dread of a deep freeze is real. It’s the sound of silence when you turn on the tap, followed by the sinking feeling that a pipe has frozen in the frigid, dark expanse of the crawl space. The go-to advice is often a frantic trip to the hardware store for foam pipe sleeves or heat tape. While these can be temporary lifesavers, they are merely treating a symptom. They are a band-aid on a problem that stems from the very structure of your home’s thermal boundary.
Most homeowners believe the solution lies in adding more and more insulation. They focus on achieving a high R-value, thinking that a thicker blanket of insulation is the ultimate defence against the cold. But in the context of an old, leaky crawl space prone to the dramatic freeze-thaw cycles of Quebec, this approach is often flawed. It ignores the two real enemies that are compromising your home and freezing your pipes: uncontrolled air leakage and invasive moisture.
What if the solution wasn’t about insulating the pipes from the cold, but about completely redefining the crawl space environment? This guide proposes a fundamental shift in perspective. The key to permanently preventing frozen pipes is to stop thinking of your crawl space as an outside, vented area and start treating it as a controlled, semi-conditioned part of your home. This systemic approach focuses on creating a robust air and moisture barrier first, effectively moving your home’s thermal boundary to include the crawl space. This doesn’t just protect your pipes; it improves your home’s overall efficiency, health, and comfort.
Through this article, we will deconstruct the problem piece by piece, from the critical rim joists to the foundation walls and the attic above. We will explore the right materials for the job, how to diagnose hidden heat loss, and how to leverage Quebec’s generous grant programs to make this essential upgrade affordable. It’s time to move beyond temporary fixes and implement a lasting solution.
Summary: A Systemic Guide to Crawl Space and Home Insulation
- Uréthane giclé vs cellulose : quel isolant choisir pour des solives de rive non étanches ?
- Rénovation de sous-sol : comment isoler les murs de béton sans créer de moisissure derrière ?
- Ventilation d’entretoit : pourquoi ajouter de l’isolant sans ventilation va pourrir votre toit ?
- Ponts thermiques : comment isoler les têtes de murs et les coins froids ?
- Rénoclimat pour l’isolation : quelles valeurs R devez-vous atteindre pour être subventionné ?
- Caméra thermique : comment interpréter les zones bleues sur vos murs en hiver ?
- Comment isoler vos tuyaux d’eau froide pour moins de 50 $CAD ?
- How to Maximize Your Grants from LogisVert, Rénoclimat, and Federal Programs in Quebec?
Uréthane giclé vs cellulose : quel isolant choisir pour des solives de rive non étanches ?
The rim joist—that perimeter of wood framing where the house structure rests on the foundation—is the single most significant source of air leakage in most older homes. In a crawl space, it’s ground zero for cold infiltration. The common approach is to stuff it with fiberglass or blow in cellulose. This is a critical mistake. These materials only slow heat transfer; they do not stop air movement. Cold winter air will simply blow through them, rendering their R-value almost meaningless and placing your nearby pipes in a direct line of fire.
This is where the concept of air barrier supremacy comes into play. You must stop the air leak before you insulate. Closed-cell sprayed polyurethane foam (SPF) excels here because it is a “three-in-one” product. It expands to fill every crack and gap, creating a monolithic, airtight seal. It also acts as a vapour barrier, preventing moisture from entering the wood structure. Finally, it provides a high thermal resistance, typically double that of cellulose or fiberglass per inch.
Cellulose, while a good insulator in controlled applications like an attic floor, is a poor choice for a damp, leaky rim joist. Analysis from Canadian contractors highlights a major flaw: cellulose can settle by up to 20% in rim joist applications over time. This settlement creates new gaps at the top of the cavity. This is especially damaging in Quebec’s climate, where intense freeze-thaw cycles cause the building materials to expand and contract, worsening these gaps year after year and creating a direct path for frigid air.
Rénovation de sous-sol : comment isoler les murs de béton sans créer de moisissure derrière ?
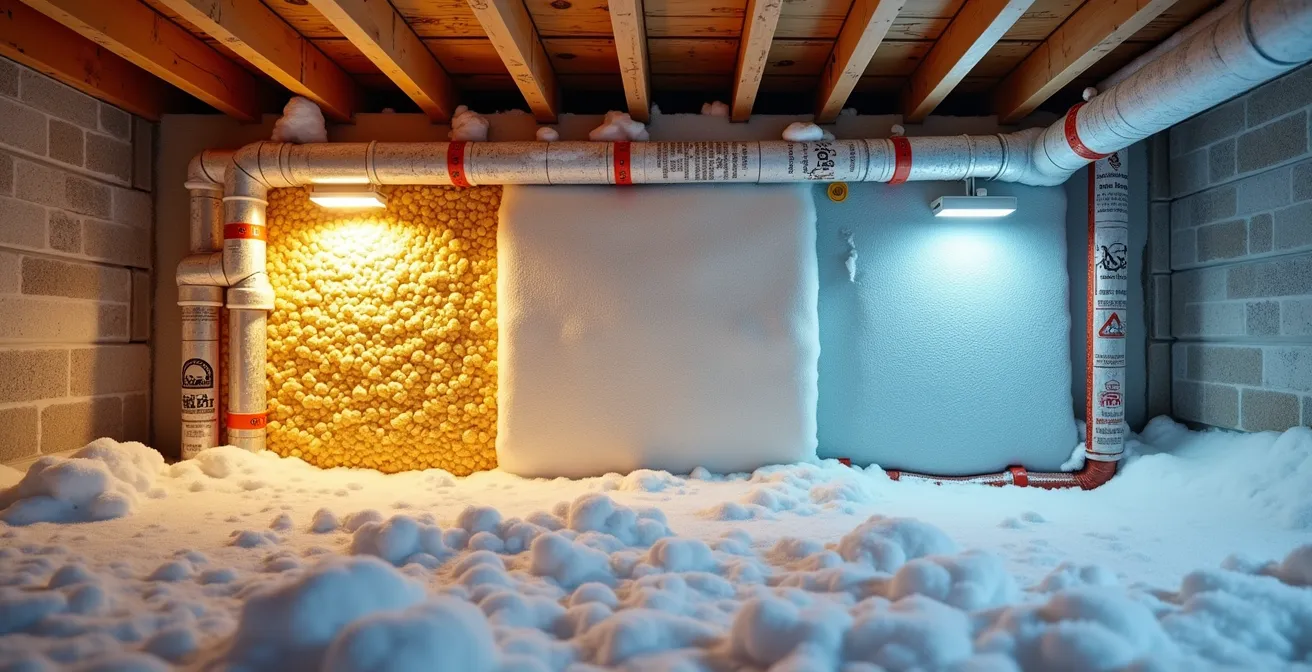
Whether it’s a full basement or a crawl space, insulating concrete foundation walls presents a major challenge: moisture. Concrete is porous and constantly wicks moisture from the surrounding soil. If you install a traditional wood-framed wall with fiberglass batts directly against the concrete, you are creating a recipe for disaster. Warm, moist indoor air will pass through the insulation, hit the cold concrete surface, and condense. Trapped behind a plastic vapour barrier, this moisture will lead to hidden mold, rot, and a musty environment that compromises your entire home’s air quality.
The solution is to use insulation that is impervious to moisture and to place it correctly within the wall assembly. Rigid foam boards (like XPS or EPS) or closed-cell spray foam should be applied directly to the concrete. This moves the condensation point away from any organic, mold-susceptible materials. By keeping the concrete wall warmer, you prevent condensation from occurring in the first place. This strategy manages the inevitable moisture drive from the soil into your home.
The image above illustrates the correct layering. The rigid foam provides a continuous thermal and moisture barrier. Any framing is then built on the *inside* of this foam layer, keeping the wood studs warm and dry. This assembly ensures that you are adding thermal comfort without creating a hidden moisture problem that could have serious consequences for your home and your health. It is a fundamental principle of modern building science applied to old foundations.
Your Action Plan: Preventing Moisture in Foundation Walls
- Moisture Barrier: Install a minimum 0.10mm (4 mil) polyethylene moisture barrier on the crawl space floor, overlapping and sealing all seams to block ground moisture.
- Exterior Insulation First: If insulating from the exterior, apply rigid foam insulation (R-20 minimum) from the footings to above the floor joists.
- Protect from Above: Cap all exterior insulation with proper metal flashing to prevent rain and meltwater from getting behind the foam.
- Interior Vapour Control: For interior work, ensure the vapour barrier always faces the warm (interior) side and meticulously seal all penetrations like pipes or wires.
- Monitor and Ventilate: After the work is done, monitor humidity levels and ensure proper ventilation ratios (a minimum of 1 part vent area to 500 parts floor area) are maintained if the space remains vented.
Ventilation d’entretoit : pourquoi ajouter de l’isolant sans ventilation va pourrir votre toit ?
While the focus is on the crawl space, a house operates as a system. Heat loss from below is connected to problems above. The “stack effect” dictates that warm, moist air rises. In winter, this air travels up through your house and into the attic. If the attic is not properly ventilated, this moisture gets trapped. When it hits the cold underside of the roof sheathing, it condenses, leading to frost in winter and dampness in summer. This constant moisture will rot your roof deck, damage your shingles, and create a breeding ground for mold.
Many homeowners think that adding more insulation to the attic floor is always better. However, if this new insulation blocks the soffit vents—the small vents under your eaves that allow cold, dry air to enter—you have just made the problem exponentially worse. You’ve cut off the attic’s ability to breathe. Proper ventilation requires a balanced system: cool, dry air enters at the soffits, washes across the underside of the roof, and exits at the ridge or gable vents, taking heat and moisture with it.
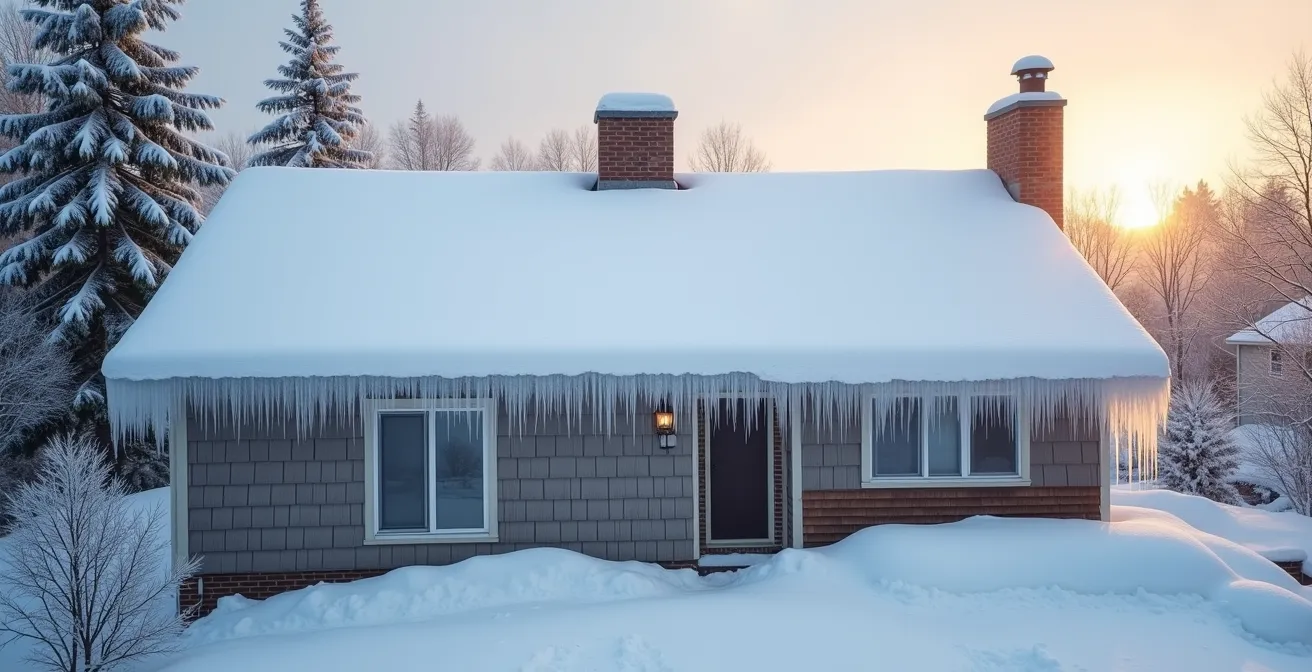
The consequences are starkly visible in winter as ice dams. As seen in the image, heat escaping into an unventilated attic melts snow on the roof. This water runs down to the cold edge of the eave and refreezes, creating a massive dam of ice that can back up under shingles and cause major leaks. The financial impact is also significant; Canadian building standards indicate that while attics in Quebec require R-60 insulation, inadequate ventilation can reduce its effective R-value by up to 40% due to moisture saturation.
Ponts thermiques : comment isoler les têtes de murs et les coins froids ?
A thermal bridge is essentially a highway for cold to travel through your home’s insulation. Wood studs, concrete slabs, and steel beams conduct heat far more effectively than insulation does. In an older home, these bridges are everywhere: the rim joists we’ve discussed, the headers above windows and doors, and the complex framing in wall corners. These are the spots that feel cold to the touch and often show signs of condensation or even frost. They are weak points in your home’s thermal envelope and directly contribute to cold floors and frozen pipes in the crawl space below.
Simply filling the cavities between studs with insulation doesn’t solve the problem, as the wood framing itself remains a bridge for heat loss. The most effective strategy is to add a continuous layer of insulation over these thermal bridges, typically on the exterior. However, in a renovation, this is often impractical. The next best solution is to use a material that can both insulate and air seal these complex areas from the inside. Once again, closed-cell spray foam is the ideal tool for the job, as it can conform to the irregular shapes of corners and headers, eliminating both thermal bridging and air leaks simultaneously.
The financial impact of ignoring these weak spots is substantial. Data from insulation professionals provides a clear picture of the potential energy savings. As shown in the accompanying analysis of uninsulated building assemblies, addressing these small but critical areas can yield significant returns.
| Location | Uninsulated Heat Loss | Fiberglass Batts | Spray Foam | Annual Heating Cost Impact |
|---|---|---|---|---|
| Rim Joists | R-1 | R-11 | R-21 | $120-180/year saved |
| Corner Studs | R-3 | R-7 | R-14 | $80-120/year saved |
| Wall Headers | R-2 | R-8 | R-20 | $100-150/year saved |
Rénoclimat pour l’isolation : quelles valeurs R devez-vous atteindre pour être subventionné ?
Quebec’s Rénoclimat program is one of the most valuable tools for homeowners looking to undertake a major insulation project. It provides both financial assistance and expert guidance to ensure the work is done correctly. However, it’s not simply a rebate for buying insulation; it’s a program designed to reward measurable improvements in your home’s energy efficiency. To qualify, you can’t just insulate one small area. The program has specific targets for both R-value and the scope of the work.
The R-values you need to achieve vary depending on the part of the house. For example, the target for attics is typically R-60, while foundation walls are R-24 or higher. But simply reaching this R-value isn’t enough. A key rule of the program, according to official documentation, is that the Quebec’s Rénoclimat program requires that a minimum of 20% of the total surface area of a given component (like the roof or foundation walls) must be insulated to the target R-value. For smaller, critical areas like the rim joist, the requirement is often to insulate at least 80% of its total length.
The grant amount is not a fixed sum. It’s calculated based on the improvement between a pre-retrofit and post-retrofit energy evaluation conducted by a certified Rénoclimat advisor. This process is crucial. The advisor’s initial report will identify the biggest sources of heat loss, helping you prioritize your investment where it will have the most impact—and generate the largest grant. To ensure a smooth process, meticulous documentation is key.
- Obtain a pre-retrofit energy evaluation from a certified Rénoclimat advisor.
- Document existing insulation levels and targeted areas.
- Ensure your project covers the minimum surface area (20% for walls/roof, 80% for rim joists).
- Collect detailed contractor invoices showing insulation type, R-value, and square footage.
- Take thorough before-and-after photos of all work areas.
- Schedule your post-retrofit evaluation to validate the improvements.
Caméra thermique : comment interpréter les zones bleues sur vos murs en hiver ?
A thermal imaging camera is an incredibly powerful diagnostic tool for any homeowner serious about improving their insulation. In winter, it provides a clear, visual map of where your house is losing heat. When you look at an interior wall, warmer areas will appear yellow, orange, or red, while colder spots will show up as dark blue or purple. Those blue zones are the villains in your home’s energy story; they represent heat escaping to the outside.
Interpreting these images correctly is key. A uniform, light blue colour across a wall might simply indicate a poorly insulated wall in general. However, sharp, dark blue lines often reveal something more specific. A vertical blue line every 16 or 24 inches is the tell-tale sign of thermal bridging through the wood studs of your wall. A chaotic, splotchy blue pattern near the floor is likely uncontrolled air leakage from the rim joist in your crawl space. Dark blue patches around windows and electrical outlets also pinpoint significant air leaks.
It’s important to understand that not all blue is created equal. A blue zone doesn’t always mean insulation is completely missing. It could indicate that the insulation is compressed, wet, or improperly installed, which severely reduces its effectiveness. For example, fiberglass insulation that has been crammed too tightly into a cavity loses much of its R-value. A thermal camera helps you differentiate between these issues, allowing you to form a precise plan of attack rather than blindly adding more insulation where it may not be needed.
Comment isoler vos tuyaux d’eau froide pour moins de 50 $CAD ?
While the core of our strategy is a systemic overhaul of the crawl space, there are situations where a quick, targeted, and budget-friendly fix is necessary to mitigate immediate risk. If you have exposed pipes in a vulnerable area and a deep freeze is imminent, insulating the pipes directly is a prudent first step. This approach can be accomplished for under $50 CAD with a quick trip to any Canadian hardware store.
The goal is to buy time and provide a basic layer of protection. This is not a permanent solution, but it is far better than doing nothing. The primary material is pre-slit foam pipe insulation, which is inexpensive and easy to install. The key is to be thorough: cover every inch of exposed pipe, secure the seams with foil tape, and use zip ties to ensure the insulation stays snug. Focus your efforts on the most critical zones: the first ten feet of pipe from where the water main enters your house, and any pipes that run along the cold exterior foundation walls.
Here is a simple shopping list for a basic pipe protection project:
- Foam Pipe Sleeves: Purchase 10-12 six-foot lengths of foam insulation sized for your pipes (e.g., 3/4-inch).
- Foil Tape: One roll of 2-inch aluminum foil tape is essential for sealing all joints and seams.
- Zip Ties: A package of heavy-duty 8-inch ties to secure the insulation, especially at bends.
- Optional Heat Tape: For the most vulnerable section of pipe, an automatic 6-foot heat cable offers an extra layer of active protection.
Interestingly, this small investment has a year-round benefit. As plumbing and renovation expert Danny Lipford points out, the problem isn’t just about winter.
During Quebec’s humid summers, uninsulated cold water pipes can sweat profusely, creating moisture problems that are just as damaging as winter freezing.
– Danny Lipford, Today’s Homeowner – Pipe Insulation Guide
Key takeaways
- The most effective way to prevent frozen pipes is to create a controlled, semi-conditioned crawl space by air sealing and insulating the foundation walls and rim joists.
- Closed-cell spray foam is the superior material for damp, leaky areas as it provides a thermal, air, and vapour barrier in one application.
- A house is a system: issues in the crawl space are linked to attic ventilation, and both must be addressed for optimal performance and to prevent moisture damage.
How to Maximize Your Grants from LogisVert, Rénoclimat, and Federal Programs in Quebec?
Undertaking a comprehensive insulation project is a significant investment, but Quebec homeowners have access to some of the best incentive programs in the country. The key to maximizing your return is “grant stacking”—strategically combining municipal, provincial, and federal programs to cover a substantial portion of your costs. The main players are Hydro-Québec’s LogisVert program, the provincial Rénoclimat program, and (until its closure) the federal Canada Greener Homes Grant.
Each program has its own focus. LogisVert is often geared towards specific upgrades like heat pumps but can include insulation. Rénoclimat is the cornerstone for major building envelope upgrades (attic, walls, foundation). The Canada Greener Homes Grant was a comprehensive program rewarding whole-home retrofits. While it is closing, understanding how it worked provides a blueprint for future federal programs.
The secret is sequencing. A Rénoclimat evaluation is almost always the best starting point, as its detailed report provides the roadmap for your entire project and is a prerequisite for many other grants. By timing your work and applications correctly, the savings can be massive.
Case Study: Strategic Grant Stacking in Montreal
A Montreal homeowner provides a perfect example of successful grant stacking. They first obtained the mandatory Rénoclimat pre-retrofit evaluation. Then, they completed major insulation upgrades, achieving R-60 in the attic and R-24 in the basement walls, costing $12,000. By timing the project before the federal program’s closure, they were able to apply for and receive financial aid from multiple sources. The result: they received a $5,000 grant from the Canada Greener Homes Grant plus another $3,200 from Rénoclimat. This brought their total out-of-pocket cost for the $12,000 project down to just $3,800. This kind of strategic planning, detailed in analyses of Quebec renovation grants, turns a major expense into a highly manageable and valuable home improvement.
With a comprehensive understanding of the technical solutions and financial incentives, the next logical step is to get a professional, on-site diagnosis. An evaluation by a certified Rénoclimat advisor will provide a customized roadmap for your home, identifying the most critical areas for improvement and officially starting the process to make your project eligible for thousands of dollars in grants.
Frequently Asked Questions about Home Insulation Diagnostics
What outdoor temperature is ideal for thermal imaging in Quebec?
A minimum 10°C temperature difference between indoor and outdoor is needed. For the most accurate readings that clearly show heat loss, it’s best to perform the imaging when the outdoor temperature is below -10°C, a common condition during a Quebec winter.
Why do blue zones appear even with new insulation?
This usually points to installation errors or unaddressed thermal bridging. Even new fiberglass batts will show as cold blue spots if they are compressed, as this crushes the air pockets that provide insulation. Blue lines can also reveal that heat is still escaping through the wood studs themselves, even if the cavities are perfectly filled.
How do I differentiate between missing insulation and moisture?
The pattern is the key. Missing insulation or a thermal bridge typically shows as a consistent, uniform blue shape or line. Moisture, on the other hand, tends to appear as irregular, splotchy, and darker blue patches. These wet spots may also change shape or intensity over time as moisture levels fluctuate.